

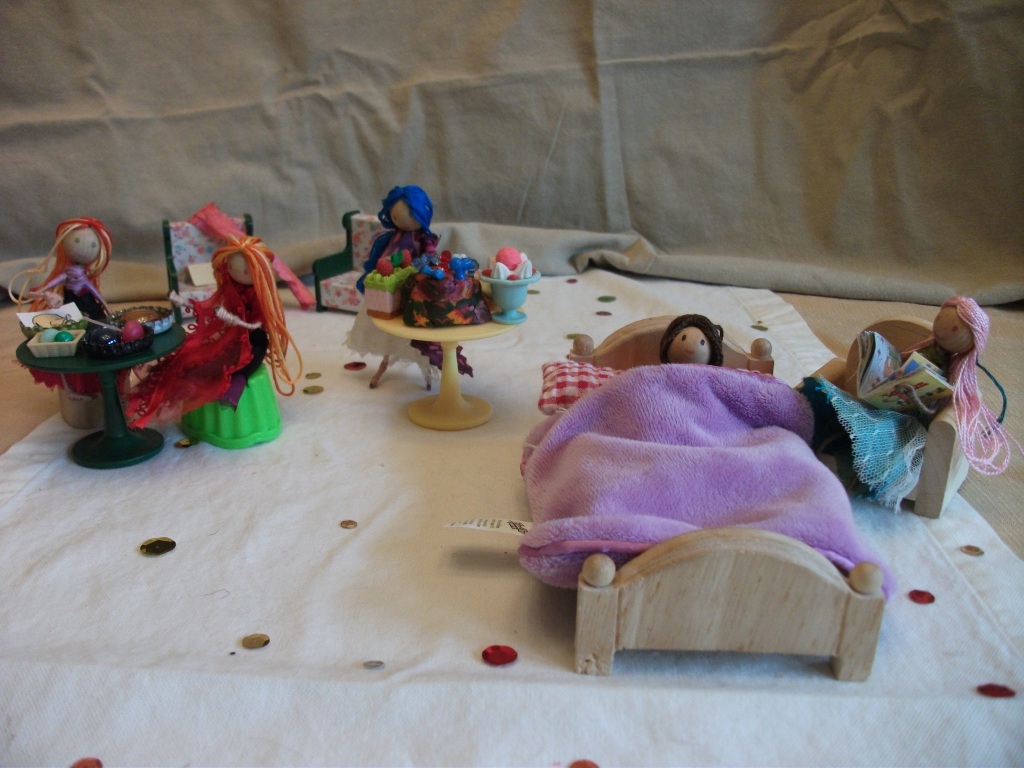
Looking for new residents for a dollhouse in your neighborhood? Why not make your own? These have been a huge hit with my own kids, filling many rainy afternoons with happy imaginative hours.
You’ll need some basic materials, many of which are plastic-free and available without plastic packaging. OK, so the hot glue sticks are heavy on the plastic, but these are toys less plastic, not “plastic-free toys”; you could always sew instead of glue, bringing the plastic factor way down. Either way, you’ll finish with flexible, customized dolls sturdy enough for years of dollhouse life. These aren’t meant for toddlers or others who engage in off-label play (eating of toys, etc), but they’re perfect for older kids and anyone who has a dollhouse to populate.
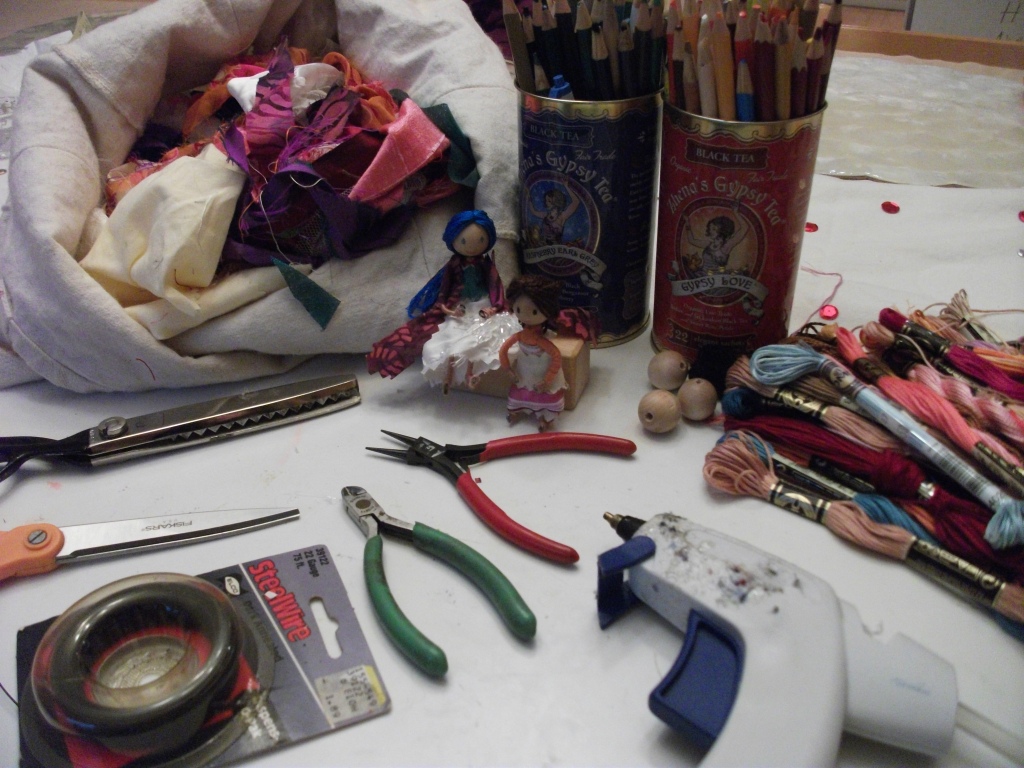
Assemble your materials:
- Fabric scraps
- Fabric scissors and pinking shears
- Embroidery floss in skin, hair, and clothing colors
- Round wooden beads in your preferred head size (check your local fabric or crafts store)
- 24 or 22 gauge blackened annealed steel wire (check your local hardware store)
- Wire cutters
- Round nose pliers
- Needle nose pliers
- Hot glue gun and its preferred sort of glue sticks
- Colored pencils
Make a doll:
For the doll’s body and shirt:

- Snip off about 12″ of wire and form a loop in the center using your round nose pliers. Twist the loop two or three times to hold it in place. This will be the doll’s neck, which will be hidden inside of the wooden bead.

- Straighten the wire “legs” to become your doll’s legs, and form flat open loops for feet where you’d like them to be. We like our dolls between 2.5″ and 4″, so I place the feet accordingly, allowing for an additional 1″ or so of head and hair on top. The photos here show closed foot and hand loops, but I’ve since discovered that I find open loops a bit easier to work with.
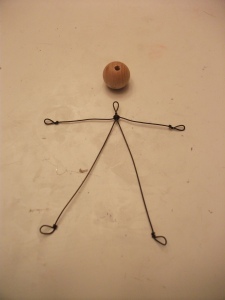
- Cut another piece of wire about 8″ long and wrap it around the leg wires, just below the neck/head loop. This wire will be your doll’s arms.
- Straighten each wire arm and form a flat open hand loop where you’d like those to be. We usually make ours about 1/2 the length of the doll’s body.
- Plug your glue gun in and get your skin color embroidery floss ready.

- Put a dab of glue on the torso of your wire skeleton, just below the head/neck loop. Set the end of your skin floss into the glue, then wrap it tightly around the doll’s trunk, then down one leg. Try for neat, tight coils of floss all the way down the leg.
- When you get to the foot loop at the bottom, pull it a bit open with your fingers. Wrap the floss around the wire just as you did for the leg, then finish the foot by wrapping the floss around both sides of the foot loop. Cover 1/2 or 3/4 of the foot this way, working from the toes back towards the leg. Add a tiny dot of hot glue to the ankle and wrap over it – This will help to keep the foot floss in place during play – Dolls get tired feet, too.
- Head back up the leg, adding a second layer of floss wrapping over the first, to add some meat to your doll’s bones and to insure complete coverage of the wire.
- When you reach the base of the doll’s torso, head down the other leg and complete it the same way.
- When you get back up to the trunk again, wrap floss around the trunk to reach the arms, then cover each arm and hand the same way you did each leg and foot.
- Finish the skin floss by wrapping around the doll’s torso a few times, adding another dot of glue and making sure the floss is well stuck into it before cutting it. I find that a standard embroidery floss skein has enough skin for two 3″ – 4″ inch dolls.

- When your doll’s skin is in place, use the same process to wrap a shirt onto her torso and arms, anchoring the ends of the floss around the base of her torso, where they’ll be hidden by her skirt.
For the doll’s head and hair:

- Try a wooden head bead onto the wire head/neck loop. If the loop is too fat to fit into the bead, squish it into a narrower shape with your flat nose pliers.
- Put a good dab of hot glue into the wooden bead then gently slide the wire head/neck loop into place. Let it set while you work on the hair.
- Select your embroidery floss hair color(s) – A blend of colors can be very pretty – and make a little wig. Fold loops of the floss together until you have the amount of length of hair you desire. Tie the loops in the exact center with a piece of the same color.
- Wool roving makes excellent doll hair, as well – It’s available in natural sheep hues as well as brighter dyed colors, and makes for lovely, fuzzy, soft, and durable hair.

- Adhere the wig to the head bead, just forward of the hole on top. Use other small dots of glue around the hole to hold strands of hair in place, covering the bare wood along the crown of your doll’s head. Use other dots of glue to further shape and control her hair in the shape and coverage you want. We leave the loops of our dolls’ hair uncut to reduce fraying, and sometimes we add a braided length on top and around the main wig.
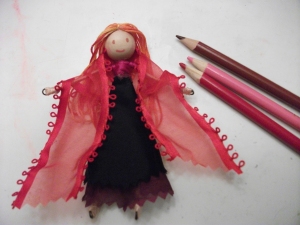
- Use colored pencils to draw on eyes, lips, cheeks, and any other details you desire on your doll’s face. When we make these, this is our last, so the doll doesn’t have to watch itself being made. My kids insist on this.
For the doll’s clothing:
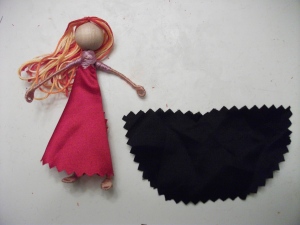
- Dress your doll in scraps of fabric, using the pinking shears to hem the raw edges; it’s not as robust as a sewn seam, but this holds up well enough for my kids – When their dolls are in tatters, we’ll just make new clothes for them.
- I find that a semi-circle makes for a decent skirt. I add a line of glue to the front of the doll’s torso, center the top edge of the skirt over the glue, then wrap the sides around her back and use glue to stick the skirt to her waist and itself along the edges. Feel free to be much more professional and seamstress-y about this! I’m into quick, easy, and imperfect when it comes to doll clothing.
- Add flair to your doll as desired – ribbon makes lovely aprons and wraps, sequins and beads make lovely brooches, etc.
What about boy dolls?
- Yes, you can use this same approach to make boys! You can dress them in fabric kilts, wrap embroidery floss trousers onto them as you did the shirt, or cut them some felt pants and glue those in place as for a skirt. For shorter hair, try cutting the wig loops and fraying the ends after the wig has been glued into place on the crown of the doll’s head – This will make for fuzzier hair with character. You can also use thicker yarns, or just draw hair on with colored pencils. It may take a few experimental heads before you come up with hair that you like. Here’s my post specifically about our DIY dolls in pants.
That’s all there is to it. It may look tricky, but it doesn’t have to be. Give it a try some rainy day, and let me know how it goes!
